


10 Tricks to Take Amazing Food Photos
Mar 16, 2019 09:10
Food photography is a fun but really challenging type of photography. You’re going to build layer by layer until you achieve the perfect harmony of reality and art. The result is the product of every decision you make.
If you’re new to this field, it can mostly get frustrating. Below are the effective tricks to take amazing food photos that will make them both attractive and mouthwatering.
Trick #1: Forget About Your On-Camera Flash
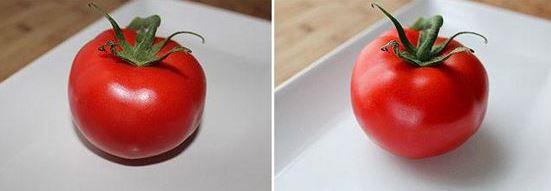
You might already be aware of this, but it’s still worth mentioning. Don’t use your on-camera flash when taking photos of food. The flash will result in a lot of dramatic highlights on areas that has moisture. It’s not only distracting but will make your food appear greasy and unappealing.
Also, shadows may appear that might distract the overall quality of the photo. It’s always best to take food photos with natural light. By natural light, we mean indirect daylight. Don’t expose your subject to direct sunlight. It tends to be harsh and will create dark and unattractive shadows. They also make white and other light colors too bright that they lose some of their shape and texture.
Take a look at this comparison above. The left photo is taken using the on-camera flash while the right one only with natural light.
Trick #2: Use a Reflector for Bright Images
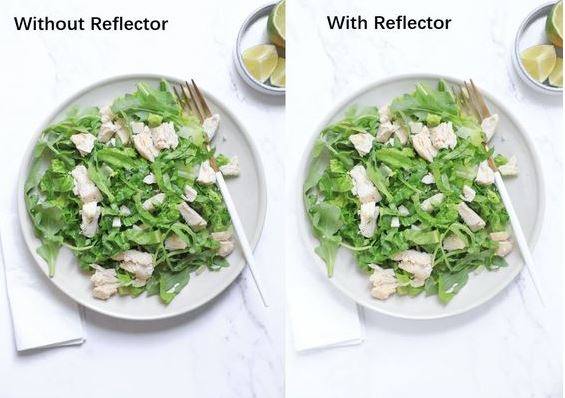
Using a diffused light source will create a soft shadow to one side of your subject. You can lighten up the dark areas by placing a reflector on the dim area of your food. This will result in the light bouncing back into the shadows to give your lighting effects a more stable appearance.
The left image was taken without a reflector, and as you can see, the shadows are more noticeable. The left image was taken with a reflector and the shadows made by the plate is softer.
If you don’t have a reflector, you can improvise by using a white napkin, aluminum foil, and even sheets of paper.
Trick #3: Shoot From Different Angles
Various dishes look great from different angles. For instance, pizzas look better when you shoot them from above, and burgers look more appealing when you take photos of them from the sides. One of the tricks to take amazing food photos is to do some experimenting and shoot your subject from different angles. This will increase your chances of nailing the perfect shot.
Trick #4: Use Backlight for Your Dish
The general rule is to never position yourself directly between your subject and the light source. Shooting with the light behind you will result in the dish looking flat and dull. Instead, position the light at the back of your dish to create texture and some drama, as you can see in the photo above.
Trick #5: Keep the Mess Minimal
Take the time to remove any unnecessary elements from the background of your dish. You can add some props, but make sure they’re not distractions. You have to think hard whether that napkin or spoon add to the photo or just adding a mess. Keep your focus to what is important, but don’t zoom in too close that people no longer understand what the dish is.
Trick #6: Play With Bright Colors
When it comes to colors, most of the food we eat is pretty much dull and boring (think about pasta, chicken, and fish). To make them more appealing and interesting, pair them up with components that have bright colors, like garnishes, napkins, plates, glassware, etc.
Trick #7: Invest in a Good Camera
You don’t need to get yourself a really expensive camera to take high-quality food photos. If you’re just starting, you can simply get a point-and-shoot camera to practice. When you’re ready, you can get a DSLR (Digital Single-Lens Reflex) camera.
You can either choose a Canon DSLR or a Nikon DSLR. The differences between the two are minimal. Choose the best camera that’s within your price range.
Before buying, it’s better to read their specs and reviews. Then, go to a photography store and personally try them out. Go for the one that you’re comfortable with and find easier to control.
Trick #8: Get Lenses for Food Photography
Many professional photographers prefer to use fixed lenses, so you might want to check them out. These lenses will not zoom in or zoom out, so you need to move closer or farther away from your subject, instead of adjusting your lenses.
The reason behind this is fixed lenses give photographers more flexibility when shooting. Also, they are typically smaller, faster, and less expensive compared to zoom lenses.
Trick #9: Make Use of Photography Equipment
Having the right photography equipment can make a huge difference in the outcome of your photos. Reflectors and diffusers are useful in letting light bounce back. One of the great things about photography is it brings out your creativity and resourcefulness. With the reflectors, you can simply use white foam boards, napkins, etc. You can easily buy them at any craft stores.
A Tripod also comes handy so you’ll have better control over the settings of your camera. It also helps you in getting high-quality photos (not blurry and grainy).
If you love to travel a lot, then a v mount battery is useful. This is to make sure that your camera won’t die in the middle of a shoot. It’s also convenient. You don’t need to bring multiple batteries because it will also work on other devices, like monitors, video recorders, lighting, etc.
Trick #10: Don’t Forget the Photography Software
Today, post-processing your photos is inevitable. You’re going to need software where you can edit and organize all your photos. Adobe Lightroom is a good choice because it’s cheaper compared to Photoshop. The best thing about this software is it lets you organize, post-process, share, and print photos, all in one place.
Conclusion
Food photography will take a lot of hard work and dedication. However, once you see the finished product, you’re going to realize how everything was worth it! Take these tricks to take amazing food photos to heart and you will see a huge difference in your food photos!